Time to share some trade tricks for the D.I.Y. types out there.
This one is a nice simple effect that really brings out the grain in your timber. If you are wanting to have a timber table with a point of difference, this is for you.
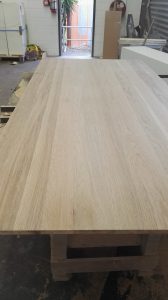
So here we have a fresh plain oak top ready for finishing. What we want to do here is express the grain so that it is contrasting the timber in a bolder fashion than usual. There are multiple ways of doing this, and multiple colours. I’ll be using black for this top. You can have white, if you happen to be wondering, this is called inverting the grain though. It pays to white wash the oak when inverting so the contrast is not so drastic. Unless of course you want bold white lines running through your timber.
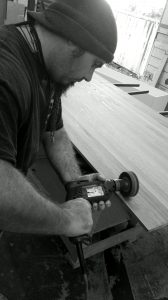
So the first step is to express the grain, again multiple ways of achieving this. You can sand blast for the most extreme, or just use a wire brush to get the timber as coarse as you want it manually. I’ll be using a drill with a grinding wire brush, I got a schedule to keep!
The purpose of the grinding is to open the grain up. Deepen it so that whatever substance we put in has more of a chance to get into the grain without being removed too easily when over-coating or from subsequent sanding. It also gives the top a nice texture, which can look tastefully rustic, and nice to run your hands over when visually tempted.
Once you have the timber opened up, it’s time to add the colour. You can do this by using stain, paint (water-based or other), spray or wipe (brushing is a bit ineffective). For this though, I’ll be using an unconventional method… guide coat.
When using stain or paint, the colour will be very bold, so to temper it down you need to thin out the paint/stain so that it is the opacity you desire; this also very even and uniform. The reason I’m using guide coat is that it is not as uniform as straight spraying. I can easily adjust the amount of black I have in any given area by how much I rub in with my application pad. This adds to the rustic antique look I’m going for. If you too are going to use guide coat (a black powder) remember to rub in using a circular motion so that it really gets in the grain. If you just rub it across in the same direction as the grain, most of your powder will sit on the surface and not penetrate properly.
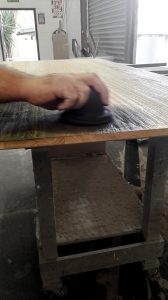
Once covered to your approval, bust out your sand paper and get to it. Sand the surface until the black dust is all clear. Obviously you don’t want to go too deep or your hard work applying the colour will have been futile. So choosing an appropriate grit would benefit you. For the surface sand I wouldn’t go any heavier than 240 grit.
Once complete you can apply your clear coat and admire your handy work.

You can use this effect with a subtle stain colour over the top; this can enhance the grain effect even more. But as always it’s entirely up to you and what it is you’re trying to achieve.
Happy D.I.Ying 🙂
2 Responses
Mark Carter
Simon,
This is awesome dude. Looks bloody spectacular.
Si
Thanks Mark,
Much appreciated 🙂
I will endeavour to blog some more finishes that come up of interest 😉